

|
||
| 在【文件列表】界面按[F4]参数进入【文件参数列表】界面,选择(4)基准点设置,然后把针头移到要选作基准点的点上方(关键位置),选定后按[ENT]确定。 In the [File List] interface, press [F4] to enter the [File Parameter List] interface, select (4) the reference point setting, then move the needle to the point above the point to be selected as the reference point (key position), press [ ENT] confirm. 在【文件列表】界面按[F4]参数进入【文件参数列表】界面,选择(2)阵列加工设置,在【阵列参数】界面按[SHF]切换阵列方式为“三维阵列”,然后根据模板设置“列数”和“行数”,按[ENT]保存后再进入【阵列参数】界面,按[F1]列数,将示教针头移到第1行最后1列的子图基准点处(如行1列3),对准子图基准点后按[ENT]确定;按[F2]行数,将示教针头移到第1列最后1行的子图基准点处(如列1行4),对准子图基准点后按[ENT]确定。然后按[#]展开,再按[ENT]单步进行检查是否正确,注:(新版本只需阵列列数或行数)。 selected as the reference point (key position), press [ ENT] OK. In the [File List] interface, press [F4] to enter the [File Parameter List] interface, select (2) Array Processing Settings, press [SHF] on the [Array Parameters] screen to switch the array mode to “3D Array”, and then set according to the template. "Number of columns" and "Number of rows", press [ENT] to save and then enter the [Array Parameters] interface, press [F1] the number of columns, and move the teaching needle to the sub-graph reference point of the last column of the first row ( For row 1 column 3), press [ENT] after the subgraph reference point is pressed; press [F2] the number of rows to move the teaching needle to the subgraph reference point of the last row of column 1 (such as column 1 row) 4) After aligning the subgraph reference points, press [ENT] to confirm. Then press [#] to expand, then press [ENT] to check if it is correct. Note: (The new version only needs array number or number of rows). 返回【文件列表】按[ENT]加工进入加工界面,按[F1]开始加工。按数字2可进行快捷键设置。 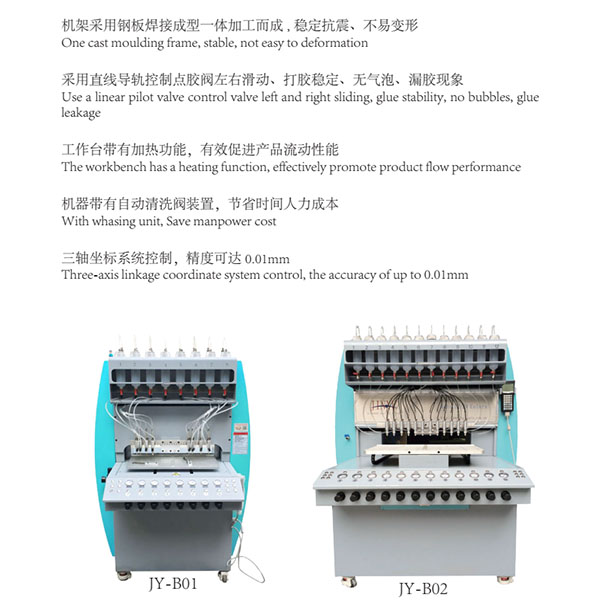  东莞市金裕自动化机械设备有限公司成立于2000年,金裕坐落于东莞市大岭山向东工业区,创办硅胶、PVC商标礼品生产设备.金裕研发的全自动点胶机、矽胶机、油压机、KPU鞋材机以及终于实现了的智能无人车间生产流水线,金裕的自动化设备可以做到让你省人、省电、省管理。金裕公司欢迎新老来访,选择金裕,没有顾虑。www.dgjyauto.com.cn 东莞市金裕自动化机械设备有限公司成立于2000年,金裕坐落于东莞市大岭山向东工业区,创办硅胶、PVC商标礼品生产设备.金裕研发的全自动点胶机、矽胶机、油压机、KPU鞋材机以及终于实现了的智能无人车间生产流水线,金裕的自动化设备可以做到让你省人、省电、省管理。金裕公司欢迎新老来访,选择金裕,没有顾虑。www.dgjyauto.com.cn |
||
| 上一篇:下个星期去到你们厂内看点胶机我提前跟你联系... 下一篇:为大家解读一下压花机的操作要领 | ||


